Introduction to Biscoff Icebox Cake
A delicious treat for homemade dessert lovers
If you’re a fan of decadent desserts but short on time, you’re in for a real treat with this Biscoff Icebox Cake. This no-bake cake is not just a feast for the eyes; it’s a delightful combination of creamy goodness and spicy caramel flavors that will leave your taste buds singing. One of the best parts? You don’t need to be a professional baker to whip this up.
Made with layers of Biscoff cookies, whipped cream, and creamy deliciousness, this cake allows you to create an impressive dessert without turning on the oven. In fact, the simplicity of this recipe means you can make it in advance, giving you more time to relax or entertain guests. Who wouldn’t love a dessert that practically makes itself?
The Biscoff cookie, with its unique caramelized flavor, has gained a cult following, making it a star ingredient in countless dessert recipes. Its crispy texture not only provides the right amount of crunch but also serves as the perfect balance to the rich, creamy layers. If you’re curious about how to incorporate this cookie into various dishes and treats, check out Food52’s article on Biscoff for more inspiration.
No need to worry about complex techniques or endless prep time. The assembly of the Biscoff Icebox Cake is straightforward, and you can even customize the recipe by adding your favorite ingredients—think fresh fruits or even chocolate layers! Plus, with its beautiful layers revealed after slicing, it’s sure to impress at gatherings or as a centerpiece at any celebration.
So, are you ready to dive into making this delightful dessert? Grab your ingredients, gather your friends, and get ready for a fun afternoon of baking (or no-baking) magic. Your homemade dessert journey is about to get a lot sweeter! Prepare to enjoy this fantastic treat that combines simplicity with an extraordinary flavor experience—your taste buds will thank you!
Ingredients for Biscoff Icebox Cake
When it comes to crafting a dreamy Biscoff Icebox Cake, having the right ingredients is key. Let’s gather what you’ll need to create this delightful dessert.
Essential ingredients you need
To kick off your cake, you’ll need the following essentials:
- Biscoff cookies: These are the star of the show—crunchy and buttery with a hint of caramel.
- Cream cheese: Adds a delicious creaminess to the layers.
- Heavy whipping cream: For that airy texture everyone loves.
- Granulated sugar: Sweetens the cream cheese mixture just right.
- Vanilla extract: A dash enhances the overall flavor profile.
These ingredients unify to create the perfect balance of sweetness and depth that embodies a classic Biscoff Icebox Cake.
Optional ingredients for added flavor
Want to elevate your cake? Consider adding:
- Chocolate shavings: For a touch of indulgence on top.
- Nutella or peanut butter: For a decadent twist that complements the Biscoff flavor beautifully.
- Chopped nuts: Such as pecans or walnuts, for an extra crunch.
These optional ingredients can elevate your Biscoff Icebox Cake, taking it from delightful to extraordinary. Why not get creative and personalize it to suit your taste? For more inspiration, check out this guide on delightful desserts!
Step-by-step preparation of Biscoff Icebox Cake
Making a delicious Biscoff Icebox Cake is simple and rewarding. This no-bake dessert layers the delightful caramel flavor of Biscoff cookies with a creamy filling that’s perfect for any occasion. Below, I’ve laid out a step-by-step guide to help you prepare this indulgent treat seamlessly.
Gather your ingredients
Before diving in, it’s essential to gather all your ingredients. Having everything at hand makes the process smoother and more enjoyable. Here’s what you’ll need:
- 2 cups of heavy whipping cream
- 1 cup of powdered sugar
- 1 teaspoon of vanilla extract
- 1 cup of Biscoff spread (like cookie butter)
- 2 packages of Biscoff cookies
- Pinch of salt (optional)
Feel free to grab some fresh fruit or chocolate shavings for optional toppings. These not only look great but add that extra flair when serving!
Prepare the Biscoff cookie layer
The first step in your Biscoff Icebox Cake journey is preparing the cookie layers. Start by deciding how thick you want your layers to be. I personally like a generous layer, as the cookies soften beautifully.
- Quick Dip: Quickly dip each Biscoff cookie in milk or a milk alternative (like almond milk or oat milk) for about a second. This ensures they are moist but not soggy.
- Layering: Place the dipped cookies on the bottom of a rectangular or square baking dish, forming an even layer. Overlap them slightly to ensure every bite is cookie-rich!
Make the creamy filling
Now it’s time for the star of the show—the creamy filling! This part is where your cake gains that luscious texture that balances the crunch of the cookies.
- Whip Cream: In a large mixing bowl, beat together the heavy whipping cream, powdered sugar, and vanilla extract until soft peaks form.
- Introduce Biscoff: Gently fold in the Biscoff spread until fully combined, creating a smooth and creamy texture. If you want a little saltiness to contrast the sweetness, a pinch of salt can elevate the flavor further.
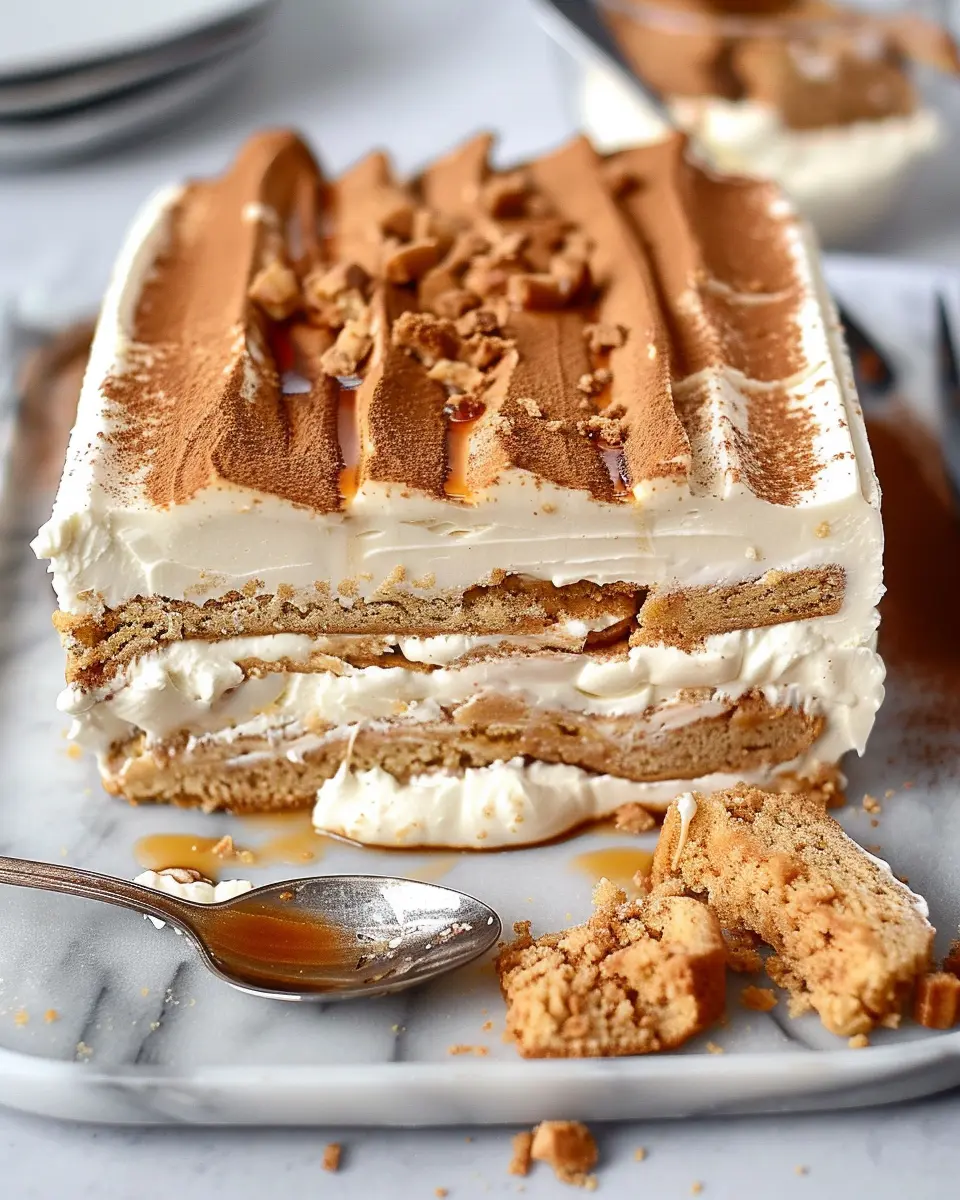
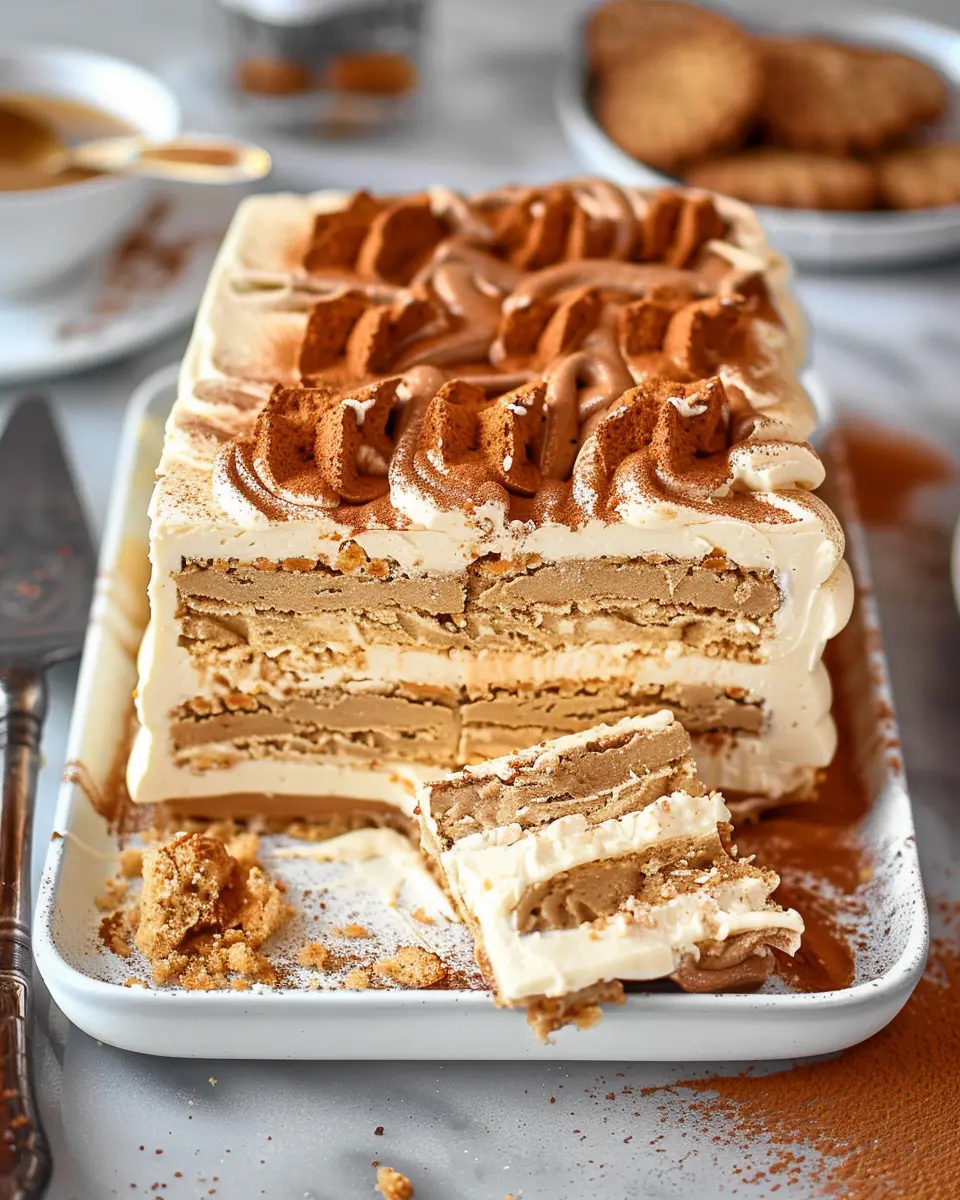
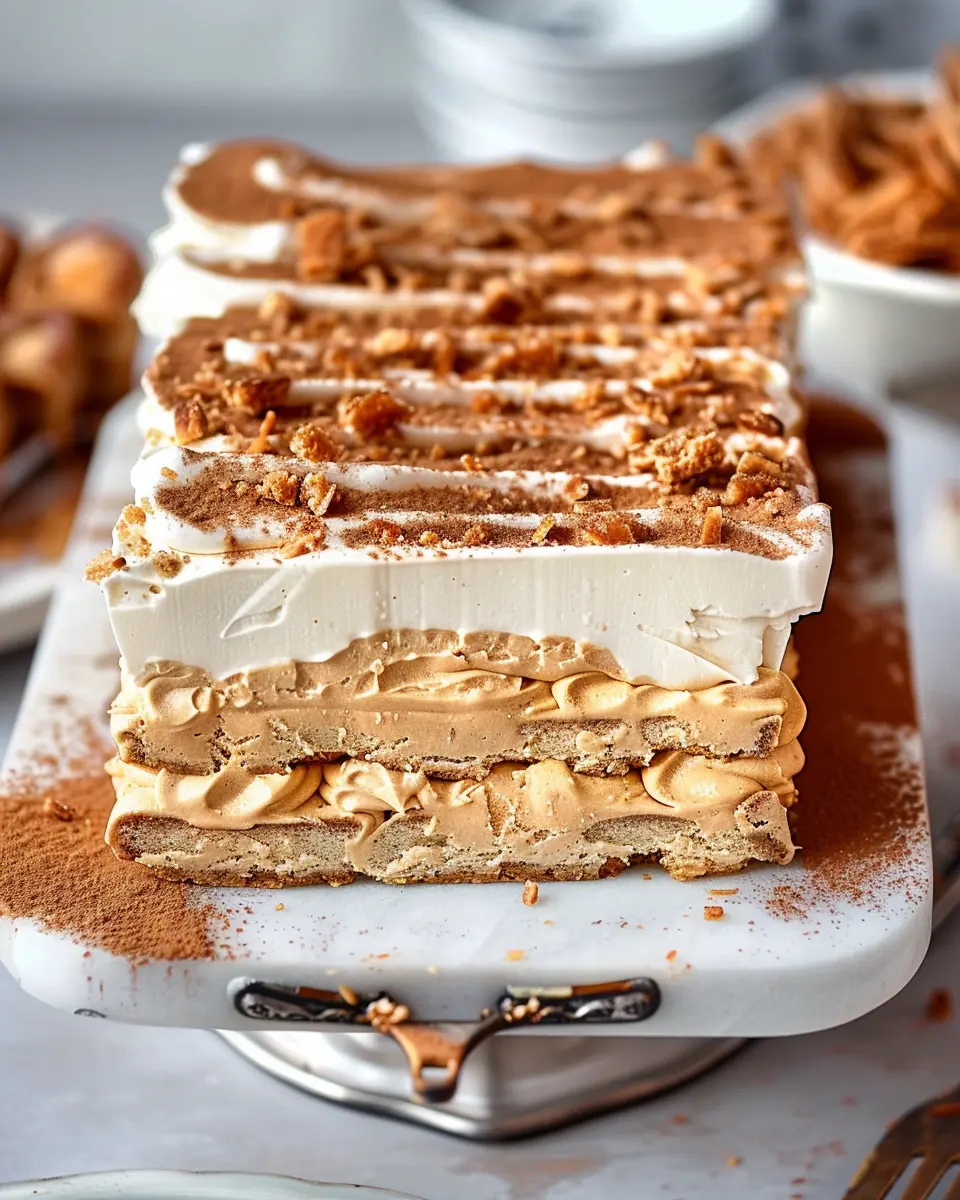
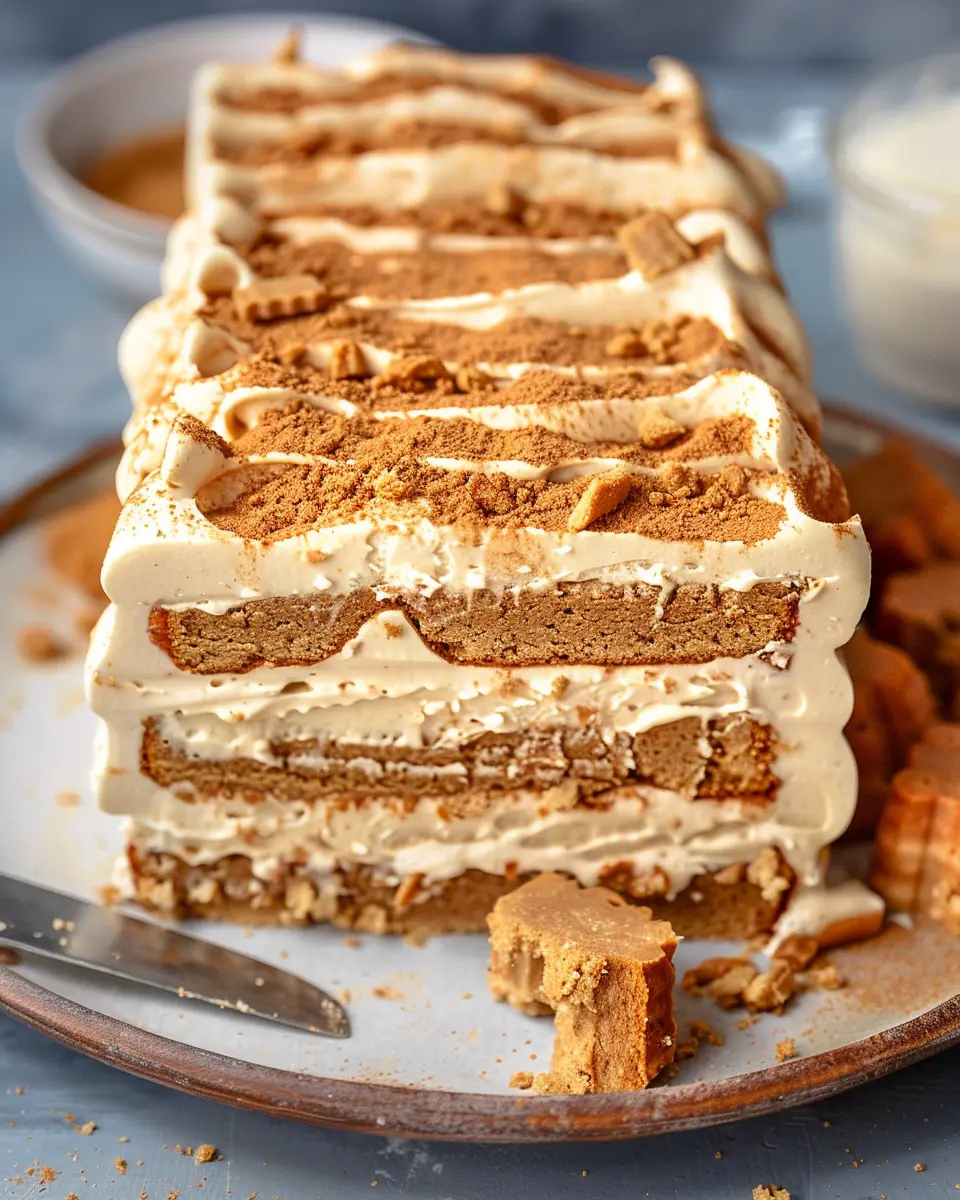
Assemble the icebox cake
With your layers and filling ready, it’s time to assemble the Biscoff Icebox Cake. Here’s how to do it:
- First Layer: Start by spreading a layer of your creamy filling on top of the cookie layer you prepared earlier.
- Repeat: Repeat the process. Place another layer of dipped Biscoff cookies over the cream, and then add another creamy layer. Depending on the depth of your dish, you can usually get 3-4 layers.
- Final Touch: Finish the top layer with the remaining creamy filling. Smooth it out beautifully—you want it to look as good as it tastes!
Let it chill
Chilling is a crucial step in making your Biscoff Icebox Cake not only delicious but also structurally sound.
- Wrap it Up: Cover the assembled cake with plastic wrap or aluminum foil.
- Chill Time: Refrigerate for at least 4-6 hours, but preferably overnight. This allows the cookies to soak up moisture and soften while flavors meld together.
When you’re ready to serve, garnish with additional Biscoff spread, crushed cookies, or fresh fruit to take it up a notch.
This cake is perfect for gatherings, birthday parties, or even a cozy night in.
For more mouth-watering dessert ideas, check out resources like Food Network or Serious Eats for inspiration. You’ll be amazed at what you can create at home!
Variations on Biscoff Icebox Cake
Alternative Cookie Options
While the classic Biscoff cookies lend a distinctive flavor to your Biscoff Icebox Cake, don’t hesitate to explore alternatives that can elevate your dessert even further. Consider using:
- Gingersnap cookies: These add a warm, spiced flavor that pairs beautifully with the creamy filling.
- Chocolate wafers: For a richer twist, chocolate can complement the sweet filling, giving your cake a decadent vibe.
- Graham crackers: Offering a lighter option, graham crackers are perfect for a more subtle flavor while still providing that delightfully crunchy base.
Each of these options can bring a unique touch to your cake, allowing you to personalize it to your taste!
Adding Different Flavors to the Filling
The magic of a Biscoff Icebox Cake lies in its versatility. Spicing up the filling can create delightful new dimensions of flavor. Here are some ideas to experiment with:
- Vanilla extract: A classic addition that enhances the overall taste and brings a warm aroma.
- Coffee or espresso powder: Incorporate a subtle coffee flavor that perfectly balances the sweetness.
- Citrus zest: A hint of lemon or orange zest can brighten the flavors and add a refreshing twist, making each bite feel light and zesty.
- Nut butters: Feel free to swirl in some almond or peanut butter for a nutty richness that complements the cake.
By playing around with these variations, you can craft a Biscoff Icebox Cake that reflects your style and culinary preferences. Not only does this keep the dessert fresh and exciting, but it also opens up opportunities for new flavor combinations that could become your next go-to! If you’re looking for more inspiration, check out Serious Eats for further creative ideas in dessert-making.
Cooking tips and notes for Biscoff Icebox Cake
Tips for perfect layering
When assembling your Biscoff Icebox Cake, take your time with the layers. Start with a solid base using a combination of Biscoff cookies and whipped cream, which creates a delightful texture. Ensure that each layer is even, as this not only looks appealing but also contributes to the overall taste. You might find that dipping cookies lightly in milk helps them soften without becoming soggy.
For a bit of flair, consider garnishing with cocoa powder or shredded coconut – this can elevate the visual appeal. You can also experiment with different spreads, like nutella or peanut butter, for a unique twist!
Common pitfalls to avoid
One common mistake is over-soaking the cookies. Just a quick dip will suffice.
Also, ensure your whipped cream is adequately whipped to avoid it collapsing before serving. Lastly, be patient! Allowing your Biscoff Icebox Cake to chill for at least six hours—or overnight—can significantly enhance the flavor and texture, making it more enjoyable.
For more insights into creating layered desserts, check out this guide on layering cakes for additional techniques!
Serving suggestions for Biscoff Icebox Cake
Pairing options for a complete dessert experience
To elevate your Biscoff Icebox Cake and create a delightful dessert spread, consider pairing it with complementary flavors. Here are some delicious options:
- Fresh Berries: Strawberries, blueberries, or raspberries add a refreshing tartness that contrasts beautifully with the rich, creamy layers of your cake.
- Whipped Cream: A dollop of lightly sweetened whipped cream not only enhances the cake’s decadence but also adds a dreamy texture.
- Coffee or Tea: A cup of freshly brewed coffee or a soothing herbal tea can act as the perfect palate cleanser, balancing the sweetness of your dessert.
Creative presentation ideas
Presentation is key, especially when showcasing a treat like the Biscoff Icebox Cake. Here are some simple yet effective ways to make your cake stand out:
- Layered Parfaits: Serve individual portions in glass jars. Alternate layers of cake with whipped cream and crushed Biscoff cookies for a visually appealing treat.
- Garnish with Spices: Sprinkle a bit of cinnamon or nutmeg on top for a warm touch and an extra flavor dimension.
- Decorative Plates: Use elegant serving platters or vibrant dessert plates to enhance the visual appeal. Don’t forget a garnishing sprig of mint or edible flowers for that wow factor!
For more tips on dessert presentations, check out resources from culinary sites like Bon Appétit or The Kitchn.
With these serving suggestions, your Biscoff Icebox Cake will not only taste amazing but look fabulous, too!
Time breakdown for Biscoff Icebox Cake
When you’re ready to whip up a delightful Biscoff Icebox Cake, it’s good to know how to plan your time efficiently. Here’s a quick overview to help you get started:
Preparation time
You’ll need about 20-25 minutes to prepare the ingredients and assemble the cake layers. This step includes mixing your creamy filling and layering the Biscoff cookies.
Chill time
Once everything is assembled, the cake needs to chill in the refrigerator for at least 4 hours. This allows the flavors to meld and the cookies to soften, creating that irresistible texture.
Total time
In total, you’re looking at roughly 4.5 hours from start to finish. While the chill time does require patience, the end result is worth every minute!
For more tips on chilling and presentation, check out resources like Food Network for inspiration on desserts that need a little time to shine. You’ll find it’s a favorite party treat that leaves everyone wanting more!
Nutritional Facts for Biscoff Icebox Cake
When indulging in a slice of Biscoff Icebox Cake, it’s good to know what you’re savoring. This delightful dessert is not just a treat; it’s also packed with nutritional information that can help you enjoy it mindfully.
Calories per Serving
Each serving of Biscoff Icebox Cake contains approximately 280 calories. This makes it a reasonably portioned dessert option when you’re looking to satisfy your sweet tooth without going overboard. Just remember, moderation is key!
Sugar Content
A typical serving has about 22 grams of sugar. While this may seem high, most of it comes from the sweet layers of Biscoff spread and cookies, which are what provide that signature flavor. If you’re looking to reduce sugar, consider using less Biscoff or exploring sugar alternatives.
Protein Content
You’ll find around 4 grams of protein in each slice. Not a protein powerhouse, but hey, it’s a dessert! You can complement it with a protein-rich snack earlier in the day to balance your intake.
For more detailed nutritional guidance, check out NutritionData or the USDA National Nutrient Database to better understand how this delightful dessert fits into your diet. Enjoy every layer of your Biscoff Icebox Cake!
FAQs about Biscoff Icebox Cake
Can I make Biscoff Icebox Cake in advance?
Absolutely! One of the best features of Biscoff Icebox Cake is its ability to be prepared ahead of time. In fact, allowing it to chill overnight enhances the flavors and gives the cookies time to soften, resulting in a creamier texture. If you’re planning for a special occasion, you can assemble it a couple of days in advance. Just keep it tightly covered in the fridge to maintain freshness.
How do I store leftovers?
Storing leftover Biscoff Icebox Cake is simple! Just cover the dish tightly with plastic wrap or transfer any remaining pieces to an airtight container. It can be stored in the refrigerator for up to a week. For an extra touch of indulgence, consider adding whipped cream just before serving for a fresh look and flavor.
What’s the best way to serve it?
Serving your Biscoff Icebox Cake can be a creative experience! I recommend cutting it into squares and serving it chilled to fully appreciate the cool, creamy texture. Consider garnishing with a drizzle of melted Biscoff spread or crumbled cookies on top. It’s not only visually appealing but also adds a delightful crunch. This cake is perfect for gatherings or cozy nights in, often leaving your guests asking for the recipe.
For more tips on cake storage and serving, you can check out resources from sites like BBC Good Food and Taste of Home. They have great insights on food preservation and serving suggestions. Enjoy your delicious creation!
Conclusion on Biscoff Icebox Cake
Wrap up and the joys of making it at home
Creating a Biscoff Icebox Cake is not just about indulging in a sweet treat; it’s an experience filled with convenience and creativity. The chilling time allows you to engage in other activities, making it the perfect dessert for busy professionals like you. With just a handful of ingredients, you can whip up a stunning dessert that is sure to impress at any gathering or simply satisfy your sweet tooth after a long day.
The best part? Sharing this masterpiece is just as delightful as making it. Don’t hesitate to let your friends in on the fun—try hosting a dessert night where they can help assemble their own! Learn more about the art of no-bake desserts at The Kitchn. Enjoy the process, savor every bite, and relish the compliments that are sure to come your way!
PrintBiscoff Icebox Cake: The Indulgent Treat You Need Today

A delightful and easy no-bake dessert that combines the rich flavors of Biscoff cookies and creamy layers for a perfect indulgence.
- Prep Time: 20 minutes
- Cook Time: 0 minutes
- Total Time: 4 hours 20 minutes
- Yield: 8 servings 1x
- Category: Desserts
- Method: No-bake
- Cuisine: American
- Diet: Vegetarian
Ingredients
- 24 Biscoff cookies
- 1 cup heavy cream
- 8 oz cream cheese, softened
- 1/2 cup powdered sugar
- 1 tsp vanilla extract
- 1 cup Biscoff spread
Instructions
- In a mixing bowl, beat the heavy cream until stiff peaks form.
- In another bowl, mix the softened cream cheese, powdered sugar, and vanilla extract until smooth.
- Fold the whipped cream into the cream cheese mixture.
- Spread a layer of Biscoff spread in a baking dish.
- Layer Biscoff cookies over the spread and then add a layer of the cream mixture.
- Repeat the layers, finishing with the cream mixture on top.
- Refrigerate for at least 4 hours before serving.
Notes
- For an extra touch, drizzle more Biscoff spread on top before serving.
- Using cold utensils can help achieve better whipped cream results.
Nutrition
- Serving Size: 1 slice
- Calories: 350
- Sugar: 25g
- Sodium: 150mg
- Fat: 22g
- Saturated Fat: 12g
- Unsaturated Fat: 8g
- Trans Fat: 0g
- Carbohydrates: 30g
- Fiber: 1g
- Protein: 3g
- Cholesterol: 50mg
Keywords: Biscoff Icebox Cake, dessert, no-bake dessert, easy recipe